Batteries lose their efficiency over time, however, if yous want to replace the bombardment of the Samsung Milky way S10, follow these piece of cake steps and y'all can replace information technology past yourself
Bombardment replacement is the ultimate solution to overcome battery related issues in your cell telephone. In this guide, nosotros will walk you through the process of replacing the battery of your Samsung Milky way S10 yourself.
Although the battery is held securely in place, yous tin remove it hands with the help of an adhesive remover or concentrated isopropyl alcohol. After replacing the bombardment, you tin use a replacement adhesive or tape to secure the bombardment and the phone cover dorsum in place.
It is essential to follow the safety protocols to minimize the chances of accidents during the battery replacement process. Before you start, discharge the battery level below 25% and, if possible, discharge the battery completely to avert whatsoever thermal blow while replacing the battery. Moreover, brand certain the phone is not overheated if the old battery is swollen.
Step 1: Removing The Back Cover
- Bleed the battery level below 25% of its capacity
- Plough off the mobile phone
- Apply controlled heat from a blow dryer or a heating gun to the right edge of the phone while making sure that it is non overheated. The adhesive layer is the narrowest on the right edge, and applying rut hither volition aid in loosening upward the adhesive, removing the back cover easily.
- Place the telephone on an angled surface such that the right border is at a college level than the rest of the phone.
- Hold the left edge of the phone to ensure that it doesn't slide abroad.
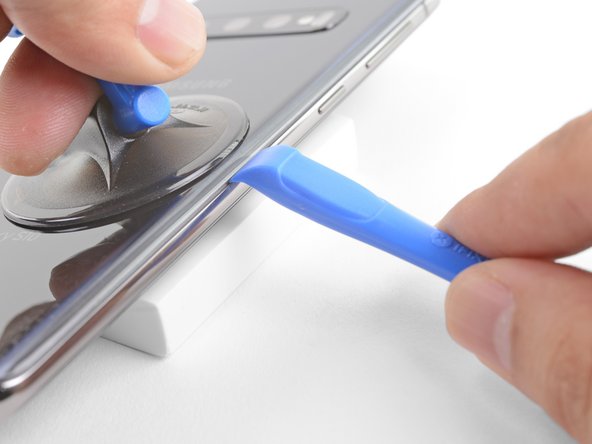
- Place the suction cup as shut to the correct edge as possible and pull it firmly, applying moderate pressure.
- Insert an opening tool (or an opening pick) into the seam between the frame and the dorsum cover towards the right side of the telephone; slide the opening tool along the seam to loosen upward the comprehend.
- Utilize heat to the right edge of the telephone in one case once more if you observe it hard to insert the pick into the seam. You can also use a few drops of 98% isopropyl alcohol to loosen the stiff agglutinative.
- Make sure not to apply excessive strength or slide the opening tool between the opening without applying oestrus. Otherwise, the back cover might break.
- Continue the opening pick between the seam to ensure that the adhesive does not reseal again.
- Side by side, apply heat to the bottom border of the phone for two minutes.
- Carefully insert the opening pick at the junction between the right border and the bottom edge. Utilise estrus once over again if you're having troubles sliding the pick into the seam
- Slide the opening tool towards the left edge, cutting through the adhesive of the lesser border
- Go out the opening pick in the bottom edge then that the agglutinative doesn't reseal once more.
- Movement to the left edge of the phone, standing with the heating action to loosen the adhesive and then inserting the pick and sliding information technology along the edge.
- Past the end of this process, you should accept four packs inserted in your phone's back cover, one on each edge. Twist one of these opening picks, pulling it upwards to separate the back encompass off from the frame.
Stride 2: Removing The Superlative Midframe
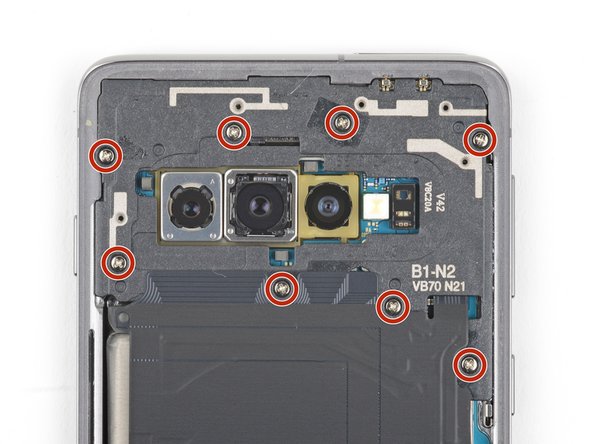
- The midframe is attached to the phone using 8 Phillips screws (each of 4mm), so you need to unscrew them get-go
- Moreover, the midframe is likewise secured around the edges using plastic clips, which demand to be removed using a spudger.
- Insert the tip of a spudger in the small notch near the book button on the right side and pull it upwardly to loosen the midframe from the telephone
- Carefully lift up the midframe from the top and remove it.
- In case the peak midframe sticks to the lower midframe, use your fingers to remove the elevation midframe gently.
Stride 3: Disconnecting The Battery From Samsung Galaxy S10
- The bombardment connector is secured to the motherboard right below the rear photographic camera. Slide the spudger's flat side in this area and carefully pull it upwards to detach the battery connector from the socket. Make sure not to disassemble any other components effectually the socket
- Make sure the flex cablevision of the battery does not come in contact with the motherboard socket during the entire procedure
Pace 4: Removing The Battery
- The battery frame (that is forth the edges of the battery) is strongly secured to the mobile while the center area underneath the battery is straight continued to the display. For this reason, you need to exist extra cautious while removing the battery equally any wrong movement can damage the phone display.
- Use an agglutinative remover or concentrated isopropyl booze to make the battery removal process easier. Employ the adhesive remover or 98% isopropyl alcohol in every corner of the battery and await for a few minutes to make sure that the adhesive bonds are broken
- You can also apply some rut from the front towards the right side of the telephone.
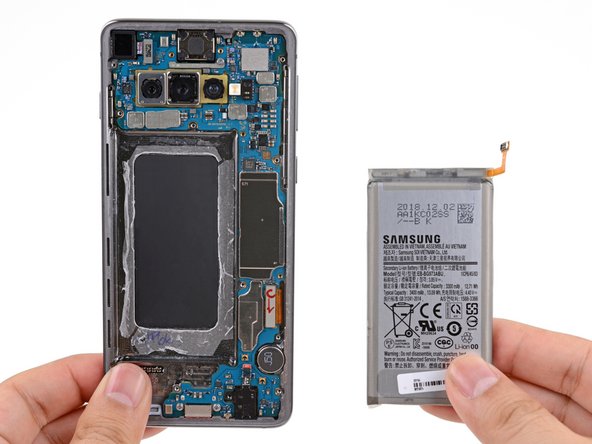
- Use a thin opening card and insert it between the battery and the lower midframe, prying out the battery gently using the menu itself or a thin spudger.
- If the bombardment does not come out, employ some more agglutinative remover to the edges and wait for 2 minutes before trying once once more
- Remove the battery and dispose it off properly so that it does not become a safety hazard for anyone else.
Step 5: Replace The Battery
- Skin off any remaining adhesive from the frame and clean it using a material and isopropyl alcohol
- You tin can use pre-cut adhesive tapes to secure the new battery to the mobile frame
- Peel off the transparent plastic layer off the agglutinative tape and stick it along the edges of the frame. In case the record is non appropriately aligned, you tin can peel it back and place it properly
- Printing the tape in identify using your fingers
- At present, remove the blue plastic layer from the tape to expose the adhesive on the height layer and place the battery on it
- Plug in the bombardment connector to check that the cable can accomplish the socket and so disconnect the connector once again
- Press the battery down with fingers to ensure that it sticks to the adhesive firmly
Step 6: Replacing The Back Cover
- Replace the midframe by just aligning its edges with the phone and laying it in place on your phone's top. You tin can then employ your fingers to utilize moderate pressure on information technology so that the edges of the midframe are secured in place.
- Earlier replacing the back cover, turn on your phone to check if everything is functioning correctly. If everything is okay, you may proceed to secure the back cover in identify.
- Replace the agglutinative forth the inner side of the back cover of your Samsung Galaxy S10. You can also place the back comprehend without using whatsoever adhesive, and for that, you lot simply need to apply some estrus and force per unit area to secure it in place.
- If you prefer to go to the service centre. Delight do encounter this for the accost.
How to Repair Galaxy Note 9
How to Repair Galaxy S9 Plus
How to Repair Galaxy S7 Edge
How to Repair Galaxy Note 8
How to Repair Samsung Battery
How to Repair Samsung Screen
How to Repair Samsung Camera
How to Repair Samsung Push
How to Repair Samsung Motherboard
-
How to Boost Performance on Slow and Sluggish Laptops
-
Best Software To Tune Up Your Windows Laptop
-
How to Fix Delayed Touchscreen Response on iPhone SE
-
Prepare "Unable to Check for Update" Effect on iPhone thirteen
-
Reply to Letters From Lockscreen on iPhone iOS15
-
Reset iPhone Habitation Screen Layout in iOS 15
-
Complete Guide to Turn Off Siri on iPhone 13
-
Top Rated Data Recovery Software For Windows Laptop 2022
-
Best Video Converters For Windows Laptop 2022
-
half dozen All-time Online Video Downloader of 2022

Can You Remove The Battery From A Galaxy S10,
Source: https://breakfixnow.com.sg/how-to-replace-the-battery-of-samsung-galaxy-s10/
Posted by: chessrowas1986.blogspot.com


0 Response to "Can You Remove The Battery From A Galaxy S10"
Post a Comment